ModuleNotFoundError:Python 中没有名为“lightgbm”的模块
ModuleNotFoundError: No module named ‘lightgbm’ in Python
Python “ModuleNotFoundError: No module named ‘lightgbm’” 发生在我们忘记lightgbm在导入前安装模块或将其安装在不正确的环境中时。
要解决此错误,请通过运行命令安装模块pip install lightgbm
。

在项目的根目录中打开终端并安装
lightgbm模块。
# 👇️ in a virtual environment or using Python 2
pip install lightgbm

# 👇️ for python 3 (could also be pip3.10 depending on your version)
pip3 install lightgbm

# 👇️ if you get permissions error
sudo pip3 install lightgbm
pip install lightgbm --user

# 👇️ if you don't have pip in your PATH environment variable
python -m pip install lightgbm

# 👇️ for python 3 (could also be pip3.10 depending on your version)
python3 -m pip install lightgbm

# 👇️ using py alias (Windows)
py -m pip install lightgbm

# 👇️ for Anaconda
conda install -c conda-forge lightgbm

# 👇️ for Jupyter Notebook
!pip install lightgbm
查看GitHub 页面以lightgbm
获取示例和官方文档的链接。
常见错误原因
出现错误的原因有多种:
- 没有
lightgbm通过运行安装包
pip install lightgbm。 - 在与您正在使用的版本不同的 Python 版本中安装包。
- 全局安装包,而不是在您的虚拟环境中。
- 您的 IDE 运行的 Python 版本不正确。
- 命名您的模块
lightgbm.py,这将影响官方模块。 - 声明一个名为
lightgbmwhich 的变量将隐藏导入的变量。
如果错误仍然存在,请获取您的 Python 版本并确保您使用正确的 Python 版本安装包。
python --version

例如,我的 Python 版本是3.10.4,所以我将lightgbm
使用pip3.10 install lightgbm.
pip3.10 install lightgbm

# 👇️ if you get permissions error use pip3 (NOT pip3.X)
sudo pip3 install lightgbm
请注意,版本号对应于我正在使用的版本pip。
pip如果您的计算机上未设置PATH ,请替换pip为
python3 -m pip:
# 👇️ make sure to use your version of Python, e.g. 3.10
python3 -m pip install lightgbm
如果错误仍然存在,请尝试重新启动您的 IDE 和开发服务器/脚本。
检查包是否安装
您可以
通过运行命令检查是否lightgbm安装了软件包pip show lightgbm。
# 👇️ check if you have lightgbm installed
pip show lightgbm

# 👇️ if you don't have pip set up in PATH
python -m pip show lightgbm
该pip show lightgbm命令将声明该包未安装或显示有关该包的一堆信息,包括该包的安装位置。
确保你的 IDE 使用正确的 Python 版本
如果未安装该包,请确保您的 IDE
使用的是正确版本的 Python。
lightgbm包,或者您的 IDE 可能被设置为使用不同的版本。例如,在 VSCode 中,您可以按CTRL + Shift + P或(在 Mac 上为⌘+ Shift+ P
)打开命令面板。
然后在字段中键入“Python 选择解释器”。

然后从下拉菜单中选择正确的 python 版本。

在虚拟环境中安装包
如果您使用的是虚拟环境,请确保您是lightgbm
在虚拟环境中而不是全局安装。
如果您还没有虚拟环境,可以尝试创建一个。
# 👇️ use correct version of Python when creating VENV
python3 -m venv venv

# 👇️ activate on Unix or MacOS
source venv/bin/activate

# 👇️ activate on Windows (cmd.exe)
venv\Scripts\activate.bat

# 👇️ activate on Windows (PowerShell)
venv\Scripts\Activate.ps1

# 👇️ install lightgbm in virtual environment
pip install lightgbm
如果该python3 -m venv venv命令不起作用,请尝试以下 2 个命令:
python -m venv venvpy -m venv venv
您的虚拟环境将使用用于创建它的 Python 版本。
lightgbm.py lightgbm您也不应该声明一个名为lightgbmas 的变量,这也会影响原始模块。
尝试重新安装包
如果错误未解决,请尝试卸载该lightgbm软件包,然后
重新安装。
# 👇️ check if you have lightgbm installed
pip show lightgbm

# 👇️ if you don't have pip set up in PATH
python -m pip show lightgbm

# 👇️ uninstall lightgbm
pip uninstall lightgbm

# 👇️ if you don't have pip set up in PATH
python -m pip uninstall lightgbm

# 👇️ install lightgbm
pip install lightgbm

# 👇️ if you don't have pip set up in PATH
python -m pip install lightgbm
尝试重新启动您的 IDE 和开发服务器/脚本。
您也可以尝试升级软件包的版本lightgbm。
pip install lightgbm --upgrade

# 👇️ if you don't have pip set up in PATH
python -m pip install lightgbm --upgrade
lightgbm.目录
- 在 Windows 上安装 lightgbm
- 在 macOS 或 Linux 上安装 lightgbm
- 在 Visual Studio Code 中安装 lightgbm
- 在 PyCharm 中安装 lightgbm
- 在 Anaconda 中安装 lightgbm
- 在 Jupyter Notebook 中安装 lightgbm
在 Windows 上安装 lightgbm
lightgbm在 Windows 上安装模块:
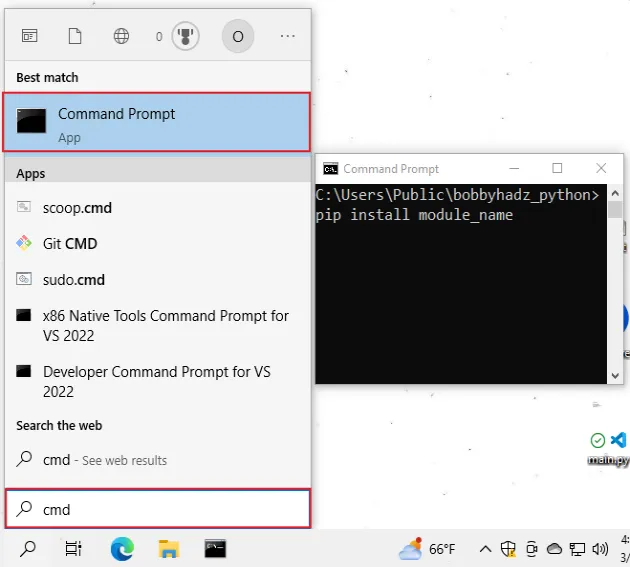
- 在搜索栏中键入 CMD,然后打开命令提示符应用程序。
- 键入
pip install lightgbm并按 Enter。
pip install lightgbm

# 👇️ for Python 3
pip3 install lightgbm

# 👇️ if you don't have pip in your PATH environment variable
python -m pip install lightgbm

# 👇️ for Python 3
python3 -m pip install lightgbm

# 👇️ using py alias
py -m pip install lightgbm

# 👇️ if you get permissions error
pip install lightgbm --user

# 👇️ for Anaconda
conda install -c conda-forge lightgbm
查看GitHub 页面以lightgbm
获取示例和官方文档的链接。
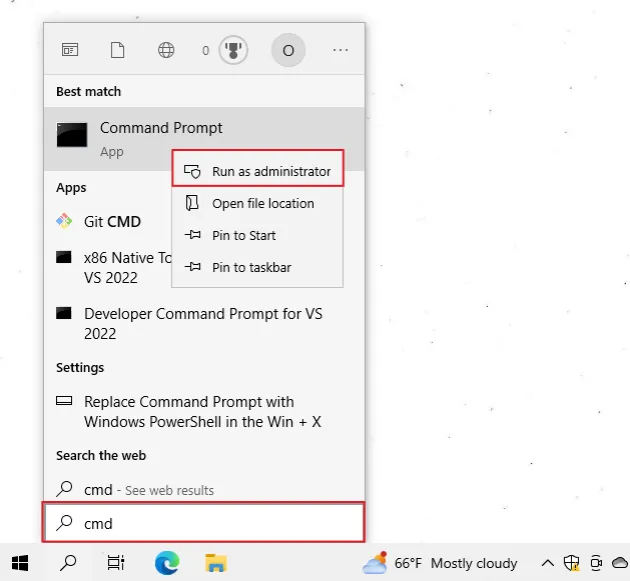
如果安装命令不成功,请尝试以管理员身份运行 CMD。
如果你收到错误
‘pip’ is not recognized as an internal or external command,python -m安装时使用命令lightgbm。
python -m pip install lightgbm

python3 -m pip install lightgbm

py -m pip install lightgbm
lightgbm或者,您可以在虚拟环境中安装该模块:
- 打开项目的根目录。
- 在资源管理器中按下
Shift并右键单击。
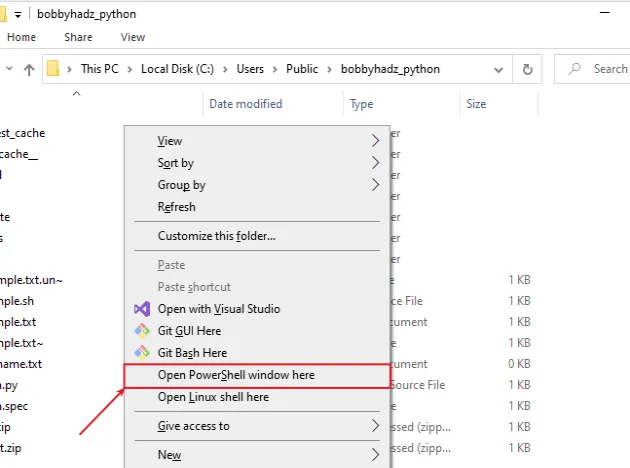
- 单击“在此处打开 PowerShell 窗口”。
- 运行以下命令。
# 👇️ might also be: "python3 -m venv venv"
python -m venv venv

# 👇️ activate on Windows (PowerShell)
venv\Scripts\Activate.ps1

# 👇️ activate on Windows (cmd.exe)
venv\Scripts\activate.bat

# 👇️ install lightgbm in virtual environment
pip install lightgbm
如果该python -m venv venv命令不起作用,请尝试以下 2 个命令:
python3 -m venv venvpy -m venv venv.
If you see an error message that
ps1 cannot be loaded because running scripts is disabled on this system,
run the following command, type “yes” when prompted and rerun the activation
command.
Set-ExecutionPolicy RemoteSigned -Scope CurrentUser
lightgbm module is installed by using the pip show lightgbm command.pip show lightgbm pip3 show lightgbm python -m pip show lightgbm python3 -m pip show lightgbm
The pip show lightgbm command will either state that the package is not
installed or show a bunch of information about the package, including the
location where the package is installed.
# Install lightgbm on macOS or Linux
To install lightgbm on macOS or Linux:
- Search for “terminal” and start the application.
- Type
pip install lightgbmand press Enter.

pip install lightgbm # 👇️ for Python 3 pip3 install lightgbm # 👇️ if you get permissions error sudo pip3 install lightgbm # 👇️ if you don't have pip in your PATH environment variable python -m pip install lightgbm # 👇️ for python 3 python3 -m pip install lightgbm # 👇️ alternative if you get permissions error pip install lightgbm --user # 👇️ for Anaconda conda install -c conda-forge lightgbm

Check out the GitHub page of lightgbm
for links to examples and the official docs.
If you get an error that pip isn’t found, use the python -m command.
python -m pip install lightgbm python3 -m pip install lightgbm
If you get a permissions error, prefix the command with sudo.
sudo pip install lightgbm sudo pip3 install lightgbm
Alternatively, you can install the lightgbm package in a virtual environment:
- Open your terminal in the root directory of your project.
- Run the following commands.
# 👇️ could also be "python -m venv venv" python3 -m venv venv # 👇️ activate virtual env on macOS or Linux source venv/bin/activate # 👇️ install lightgbm in virtual environment pip install lightgbm
Your virtual environment will use the version of Python that was used to create
it.
python3 -m venv venv command doesn’t work, use python -m venv venv instead.You can use the pip show command to verify
lightgbm has been installed
successfully.
pip show lightgbm
pip3 show lightgbm

python -m pip show lightgbm
python3 -m pip show lightgbm
The pip show lightgbm command will either state that the package is not
installed or show a bunch of information about the package.
# Install lightgbm in Visual Studio Code
To install lightgbm in Visual Studio Code:
- Press CTRL + ` (Backtick) on your keyboard to open the terminal.
- Run the
pip install lightgbmcommand to install thelightgbmmodule.
pip install lightgbm

# 👇️ for Python 3
pip3 install lightgbm

# 👇️ if you get permissions error
sudo pip3 install lightgbm

# 👇️ if you don't have pip in your PATH environment variable
python -m pip install lightgbm

# 👇️ for python 3
python3 -m pip install lightgbm

# 👇️ using py alias
py -m pip install lightgbm

# 👇️ alternative if you get permissions error
pip install lightgbm --user

CTRL+Shift+P and then typing “View: Toggle Terminal”.Check out the GitHub page of lightgbm
for links to examples and the official docs.
When installing Python modules in Visual Studio code, make sure that
your IDE is configured to use the correct Python version.
Press CTRL+Shift+P or (⌘ + Shift + P on Mac) to open the command
palette.
Then type “Python select interpreter” in the field.

Then select the correct Python version from the dropdown menu.

You can use the python --version command if you need to get your version of
Python.
python --version
python3 --version

You can also try creating a virtual environment if you don’t already have one.
# 👇️ could also be "python -m venv venv" or "py -m venv venv"
python3 -m venv venv

# 👇️ activate on Unix or MacOS
source venv/bin/activate

# 👇️ activate on Windows (cmd.exe)
venv\Scripts\activate.bat

# 👇️ activate on Windows (PowerShell)
venv\Scripts\Activate.ps1

# 👇️ install lightgbm in virtual environment
pip install lightgbm
Your virtual environment will use the version of Python that was used to create
it.
# Install lightgbm in PyCharm
To install lightgbm in PyCharm:
- Press
Alt+F12on your keyboard to open the terminal. - Run the
pip install lightgbmcommand to install thelightgbmmodule.
pip install lightgbm

# 👇️ for Python 3
pip3 install lightgbm

# 👇️ if you get permissions error
sudo pip3 install lightgbm

# 👇️ if you don't have pip in your PATH environment variable
python -m pip install lightgbm

# 👇️ for python 3
python3 -m pip install lightgbm

# 👇️ using py alias
py -m pip install lightgbm

# 👇️ alternative if you get permissions error
pip install lightgbm --user

Check out the GitHub page of lightgbm
for links to examples and the official docs.
Alternatively, you can use the IDE itself to install the module.
- Click on “File” > “Settings” > “Project” > “Python Interpreter”.
- Click on the
+icon and typelightgbm. - Click on “Install Package”.
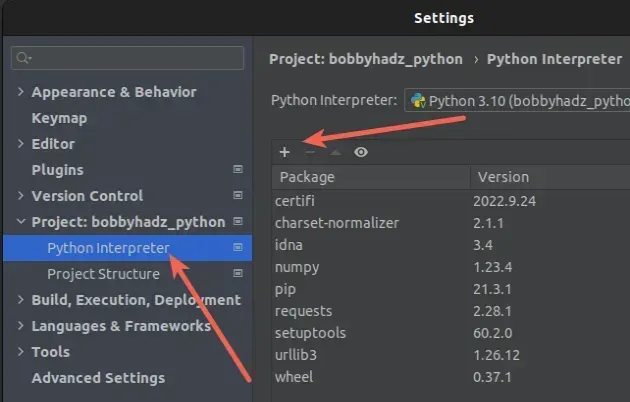
Click on “File” > “Settings” > “Project” > “Python Interpreter”.
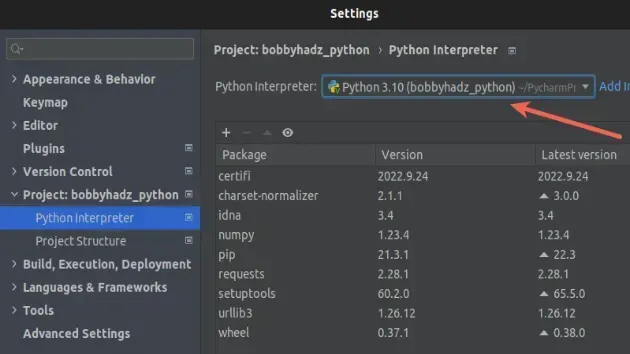
Then select the correct Python version from the dropdown menu.
You can use the python --version command if you need to get your version of
Python.
python --version
python3 --version

# Install lightgbm in Anaconda
To install lightgbm in Anaconda:
- Open your Anaconda Navigator.
- Click on “Environments” and select your project.
- Type
lightgbmin the search bar to the right. - Tick the
lightgbmpackage and click on “Apply”.
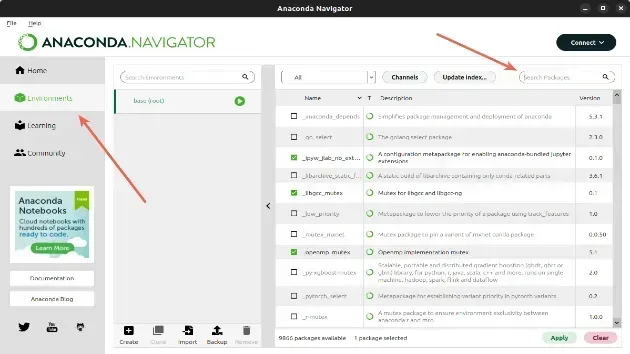
Check out the GitHub page of lightgbm
for links to examples and the official docs.
Alternatively, you can install the lightgbm package with a command.
If you are on Windows, search for “Anaconda Prompt” and open the
application.
If you are on macOS or Linux, open your terminal.
Run the following command to install the lightgbm package.
# 👇️ using conda
conda install -c conda-forge lightgbm

# 👇️ Alternatively use `pip`
pip install lightgbm

# 👇️ for Python 3
pip3 install lightgbm

# 👇️ if you get permissions error
sudo pip3 install lightgbm

# 👇️ if you don't have pip in your PATH environment variable
python -m pip install lightgbm

# 👇️ for python 3
python3 -m pip install lightgbm

# 👇️ using py alias
py -m pip install lightgbm

# 👇️ alternative if you get permissions error
pip install lightgbm --user
Click on the
following article
if you need to install a specific version of the package using Anaconda.
# Install lightgbm in Jupyter Notebook
To install lightgbm in Jupyter Notebook:
- Open your terminal and type “jupyter notebook”.

- Click on “New” and then “Terminal” in the browser tab.
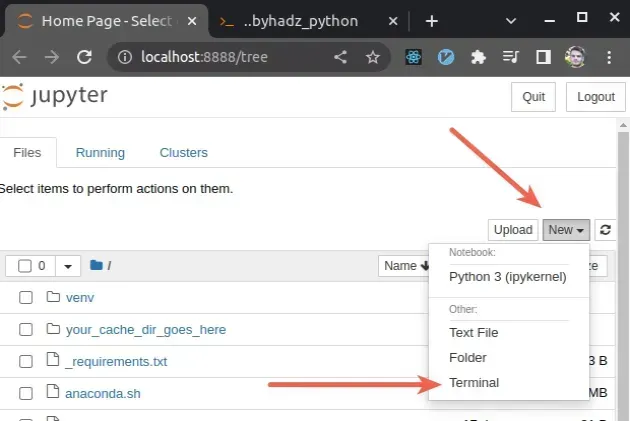
- Type
pip install lightgbmand press Enter.
# 👇️ using pip
pip install lightgbm

# 👇️ for Python 3
pip3 install lightgbm

# 👇️ if you get permissions error
sudo pip3 install lightgbm

# 👇️ if you don't have pip in your PATH environment variable
python -m pip install lightgbm

# 👇️ for python 3
python3 -m pip install lightgbm

# 👇️ using py alias
py -m pip install lightgbm

# 👇️ using conda
conda install -c conda-forge lightgbm

# 👇️ alternative if you get permissions error
pip install lightgbm --user
Check out the GitHub page of lightgbm
for links to examples and the official docs.
Alternatively, you can use the Python ipykernel.
- Open your terminal and type “jupyter notebook”.

-
Click on “New” and then click on “Python 3 (ipykernel)”.
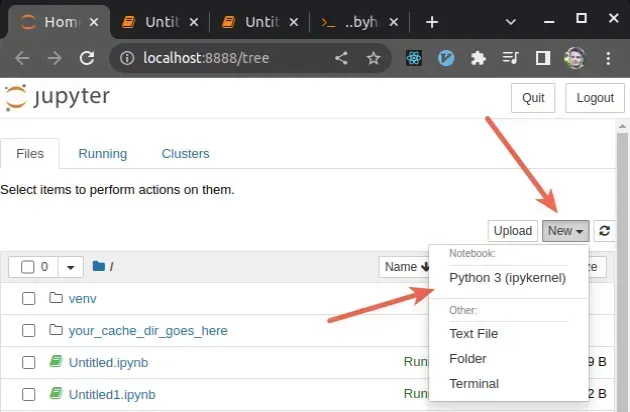
-
Type
!pip install lightgbmand click on “Run”.
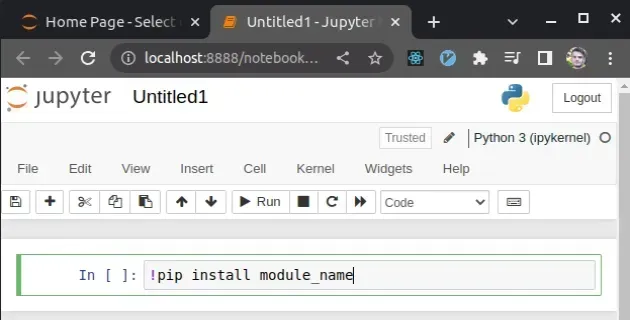
Note that the pip install command must be prefixed with an exclamation mark if
you use this approach.
!pip install lightgbm
Once you type the command, click “Run” to install the lightgbm module.
如果出现权限错误,例如“ [WinError: 5] Access is denied”,请将
--user选项添加到安装命令中。
!pip install lightgbm --user
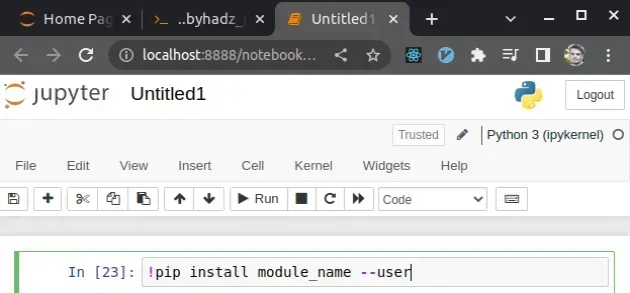
如果错误仍然存在,请尝试
重新启动 Jupyter 内核
并重新运行该命令。
